Departure and Entry: From the Carry-on Folder to Your Study Permit
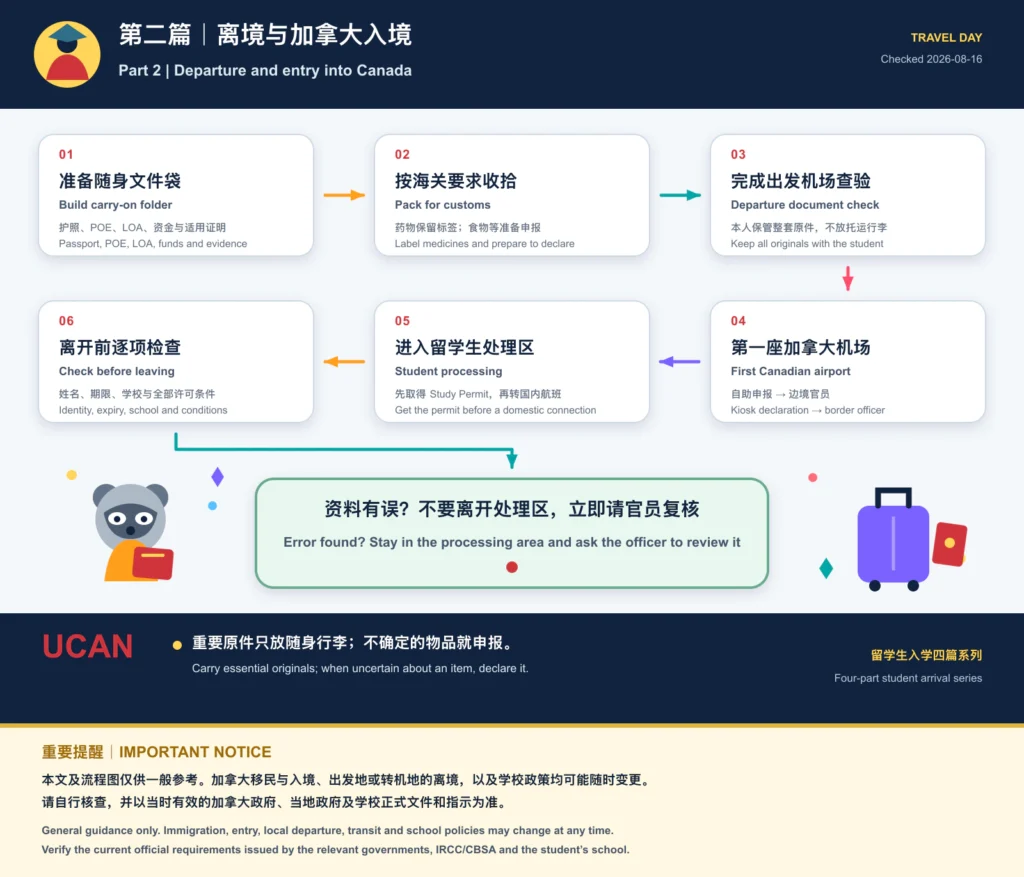
1. Build one carry-on document folder
Never place the essential originals in checked baggage. Put them in this order: passport with the required TRV or linked eTA; printed POE letter; current LOA and any approved deferral or enrolment letter; tuition and housing receipts; recent proof of funds; valid immigration medical-exam proof if required; every additional document named by the visa office; CAQ if studying in Quebec; and the Canadian accommodation, school and emergency contacts.
Also carry the original academic records requested by the school, vaccination record, important prescriptions and doctor’s letter, insurance confirmation, and certified English or French translations where appropriate. A minor travelling alone or with only one parent should carry the required custodianship, consent and family documents. Make digital copies, leave another set with family and keep backups separate from the originals.
2. Pack for customs
Keep important medicine in its labelled packaging and check Canadian import limits. Follow the airline’s rules for liquids, power banks and spare batteries. Prepare to declare all food, plant and animal products, including snacks, dried meat, herbs and seeds. Declare alcohol, tobacco and vaping products. Currency and monetary instruments totalling CAN$10,000 or more must also be declared. When uncertain, declare the item and let the officer decide.
Eligible travellers may optionally submit an Advance Declaration in ArriveCAN up to 72 hours before arrival. It can save time but does not replace the border interview.
3. At the departure airport
Use the passport connected to the eTA or containing the TRV. At airline check-in, show the passport, POE letter and itinerary, and keep the LOA ready. The student should personally hold the complete folder through security, boarding and the flight. Before boarding, recheck the gate and keep the Canadian accommodation address available.
About one to two weeks before departure, reopen the housing portal and move-in email. Confirm that the residence contract is accepted, required payments show as received, and the room or building assignment has been issued where applicable. Reserve a move-in appointment if the school requires one. Confirm the earliest permitted move-in date, desk hours, identification needed for key collection and the procedure for an evening, weekend or delayed arrival. A flight landing before residence opens requires temporary accommodation; a housing application or wait-list position is not permission to arrive and collect a key. Carry the residence confirmation, payment receipt, full address and Housing contact in the document folder.
4. At the first Canadian airport
Follow “Arrivals/Customs” signs. At a kiosk or eGate, scan the passport, take the required photo, answer every declaration question truthfully and bring the receipt to the border services officer. Say clearly: “This is my first entry as an international student. I need my Study Permit,” then present the passport, POE letter and LOA.
The officer may ask about the school, program, start date, accommodation, tuition, funds and plans after study. Answer briefly and consistently with the application. If something material changed, explain it honestly and show the supporting document.
5. Complete student processing before the connection
The student may be sent to a separate immigration or international-student processing area. Wait until an officer returns the passport and prints the Study Permit. This additional processing is normal. At a connecting airport, complete this step before collecting baggage for customs or continuing to the domestic flight.
6. Read the Study Permit before leaving
Compare the permit with the passport and school documents. Check the name, date of birth, passport details, school or DLI information where shown, level of study, expiry date and every condition, especially work wording and any medical restriction. If something appears wrong, ask the officer to review it before leaving the processing area. If the school needs proof of the entry date, ask whether a passport stamp can be provided before leaving customs.
Secure the Study Permit, collect every bag, complete customs and then enter the public arrivals hall. Photograph the permit for a private backup in a secure place, but never post it or its document number online.
Important notice
This article and its flowchart provide general practical suggestions only. Canadian immigration and entry requirements, local departure or transit rules and school policies may change at any time. Before travelling or completing border procedures, readers must independently check and follow the current official documents and instructions issued by IRCC, CBSA, the relevant local authorities, the airline or transit authority where applicable, and the student’s school. Current official requirements always prevail.
Official links to check before acting: IRCC—Prepare for your arrival ·